Ordering AND using KVM consoles on Windows and Linux systems
What is KVM?
KVM stands for KVM switch, (from the words Keyboard, Video, Mouse) - it is a device that allows two or more computers to be connected to a minimum of one set consisting of a mouse, keyboard and monitor. In our case, the KVM console allows remote access to the resources of a dedicated server as if a keyboard, mouse and monitor were physically attached to it. A KVM console resembles a remote desktop connection with the difference that a KVM connection requires the appropriate hardware to be connected directly to the computer set. Another significant difference is the type of connection to the server. A KVM console does not require an Internet connection on the dedicated server itself because the KVM switch, in addition to just connecting to the server, is also connected to a switch with Internet access.
Once we know what the connection to our server with the KVM console is all about, we can move on to ordering it.
Attention: Ordering from the panel and then using the KVM console is completely free with us!
How to order a KVM console from the MEVSPACE panel?
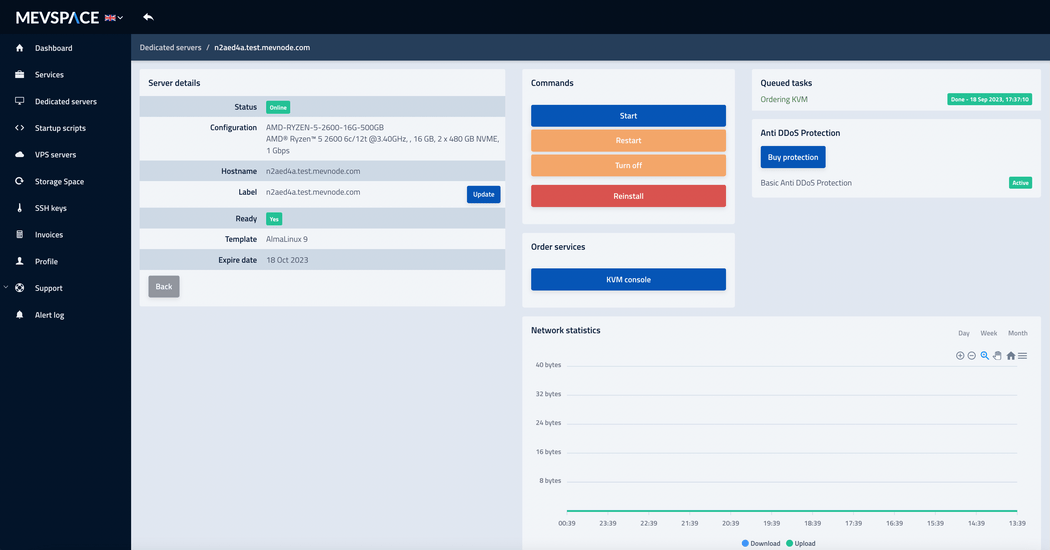
After logging in to the panel: https://panel.mevspace.com/, we go to the preview of our dedicated server, in order to order KVM console on the preview of our selected server, click the blue button KVM console.
After selecting this option, we will receive a message with information about the time after ordering the KVM console, it will be connected to our server and how long we will have access to it after connecting.
If we have read the message AND agree to the displayed terms and conditions, we approve the KVM console order.
How to connect to the KVM console?
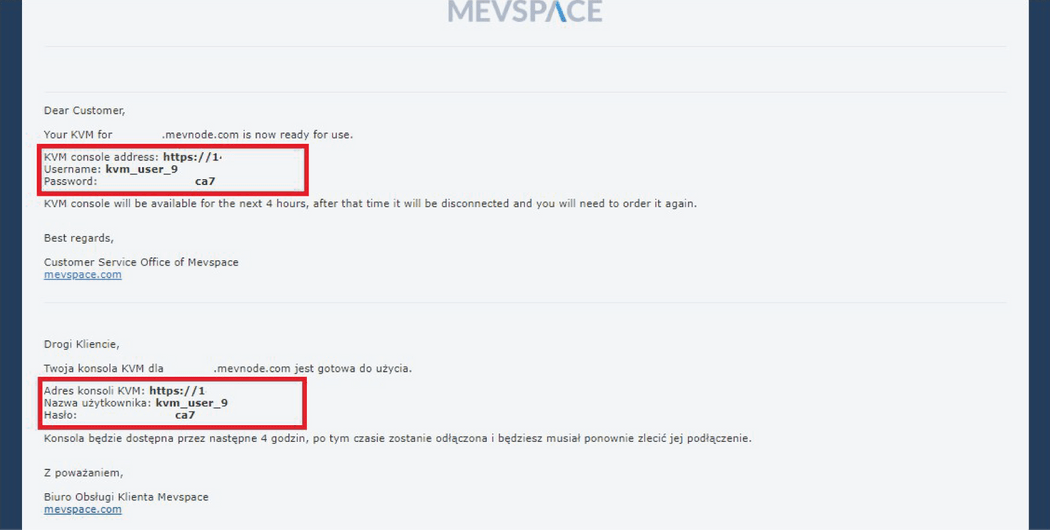
After ordering the KVM console, it will be hooked up to our server as soon as possible, once the DataCenter employee has connected the KVM console to our server, we will receive an email to the email provided in the system with information about the connected KVM console.
A unique www/IP address will be available in the email, which should be accessed by copying it from the email and pasting it into the address bar of our browser. We will also need a username and password to connect to our dedicated server via the KVM console, which can be seen in the same email below the KVM console address.
After going to the address from the email message, log in to the console with the received login data by typing/pasting them into the appropriate fields and then confirming these data with the Login button.
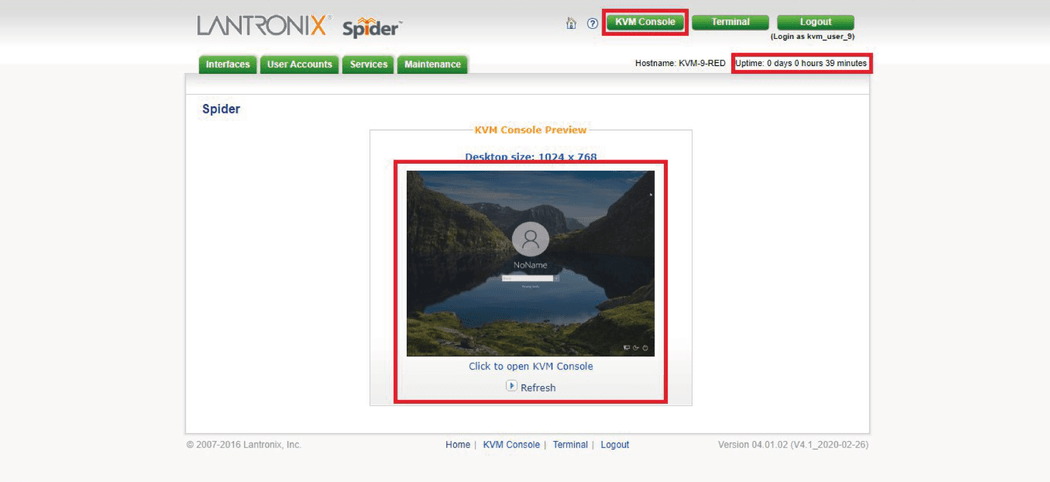
Our eyes will then see the main screen of our freshly connected KVM console.
To properly use the KVM console, click the thumbnail screen preview of our dedicated server or the KVM Console button.
Note: Sometimes it will happen that instead of viewing our monitor we will see only a black square or a message about the lack of signal, but this is not usually a sign of malfunctioning of the KVM console, seeing such a message we still try to open the KVM console because the lack of preview may indicate an active screen saver/dedicated server hibernation, but if after starting the KVM console and possibly restarting the server we do not have a preview, please contact our 24/7 technical support available at the following e-mail address: admin@mevspace.com.
Windows – Java
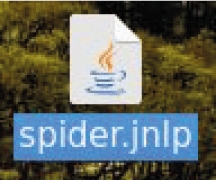
When you click on the thumbnail preview of our server screen or the KVM Console button, it will start downloading the spider.jnlp file. This is a Java application file that allows us to control our dedicated server through the KVM console.in order for the console to work properly, you must have Java software installed, available for download for Windows at: https://www.java.com/en/download/.
In order for the Java software on Windows to properly run files with the *.jnlp extension, you need to associate them with the Java software.
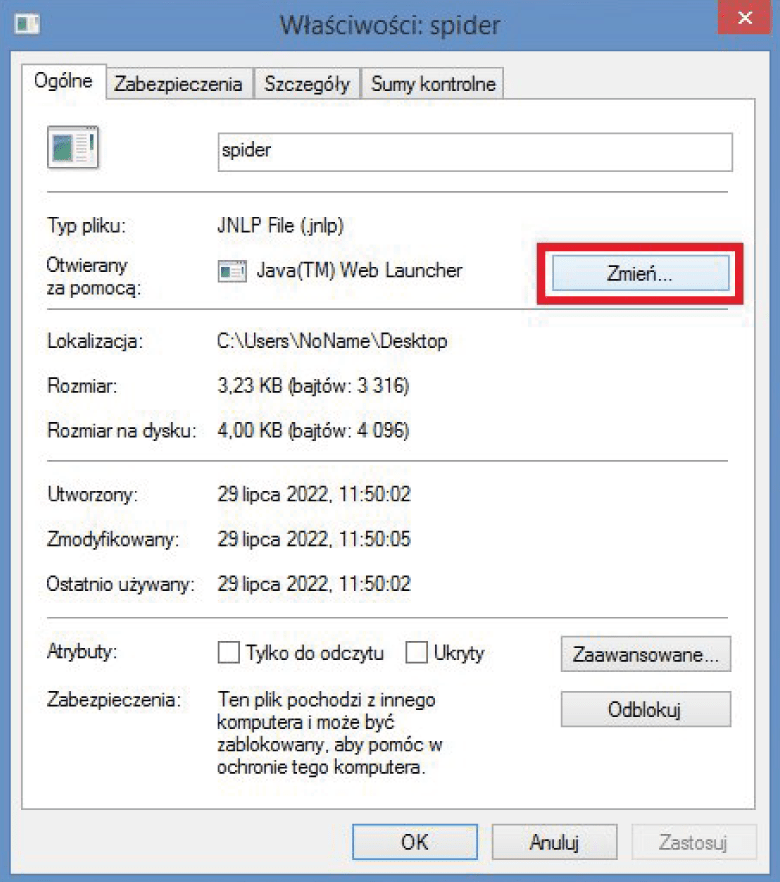
To do this, after downloading the spider.jnlp file, we right-click on it and then select Properties.
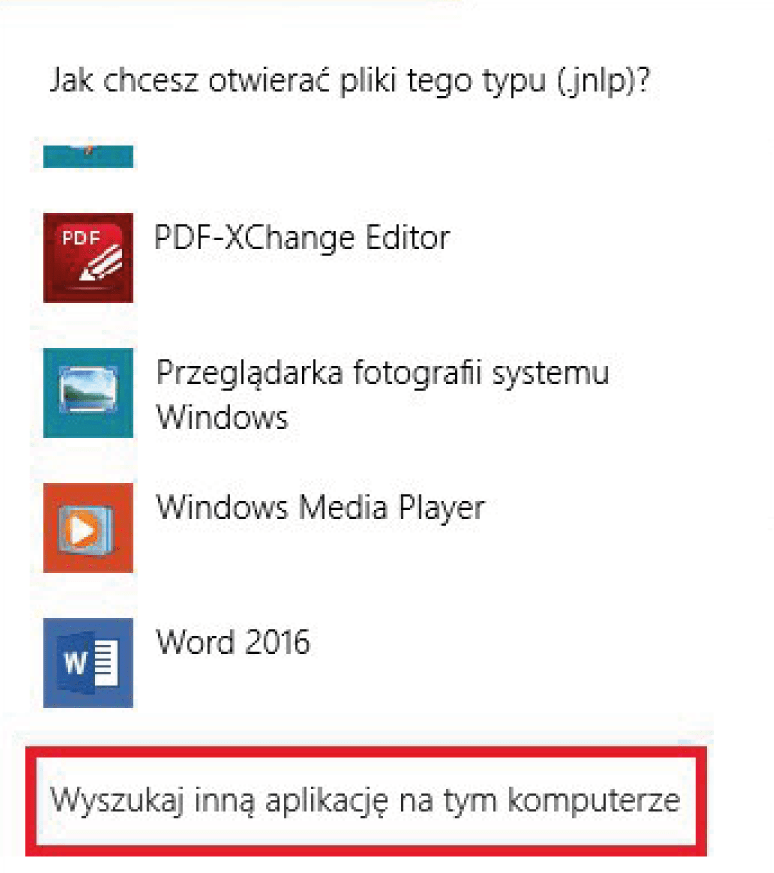
Then we click the Change button, in the notification pane we click on More options.
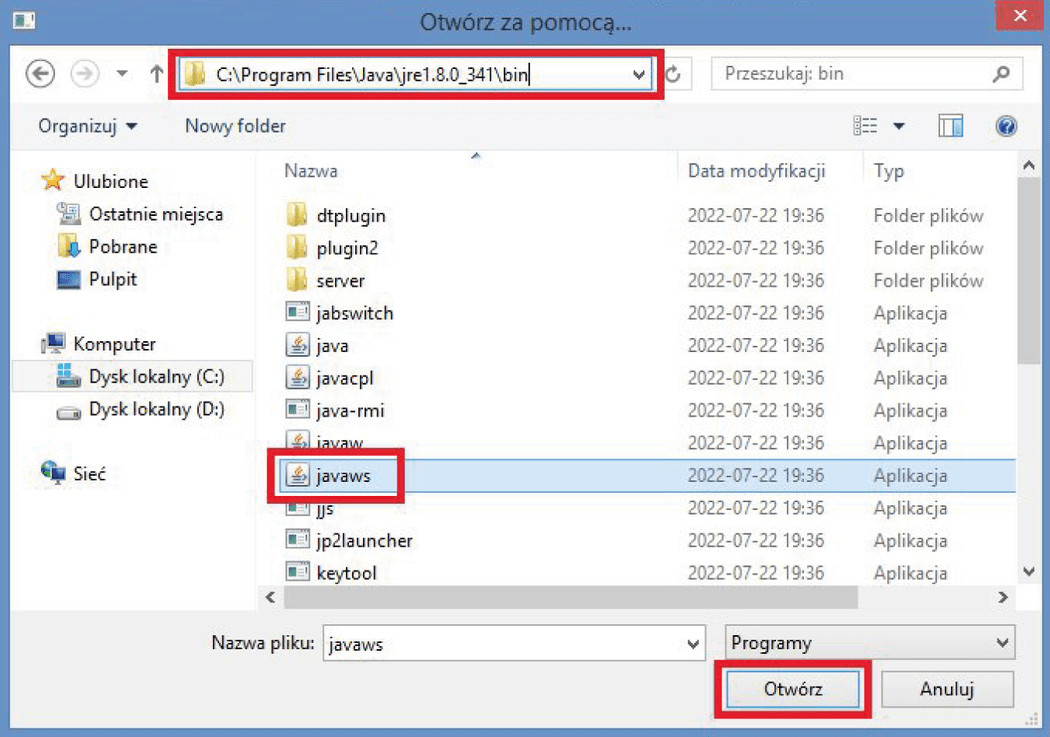
Then we go to the very bottom and select Search for another application on this computer: a window will open for us to select the program that runs jnlp applets, in this window we go to the directory where Java is installed, the default path leading to the directory in 64-bit Windows is as follows:
C:\Program Files\Java\jreX.X.X.X\bin
In place of X.X.X.X, you will see the currently installed version of Java software, in the test case it will be:
C:\Program Files\Java\jre1.8.0_341\bin
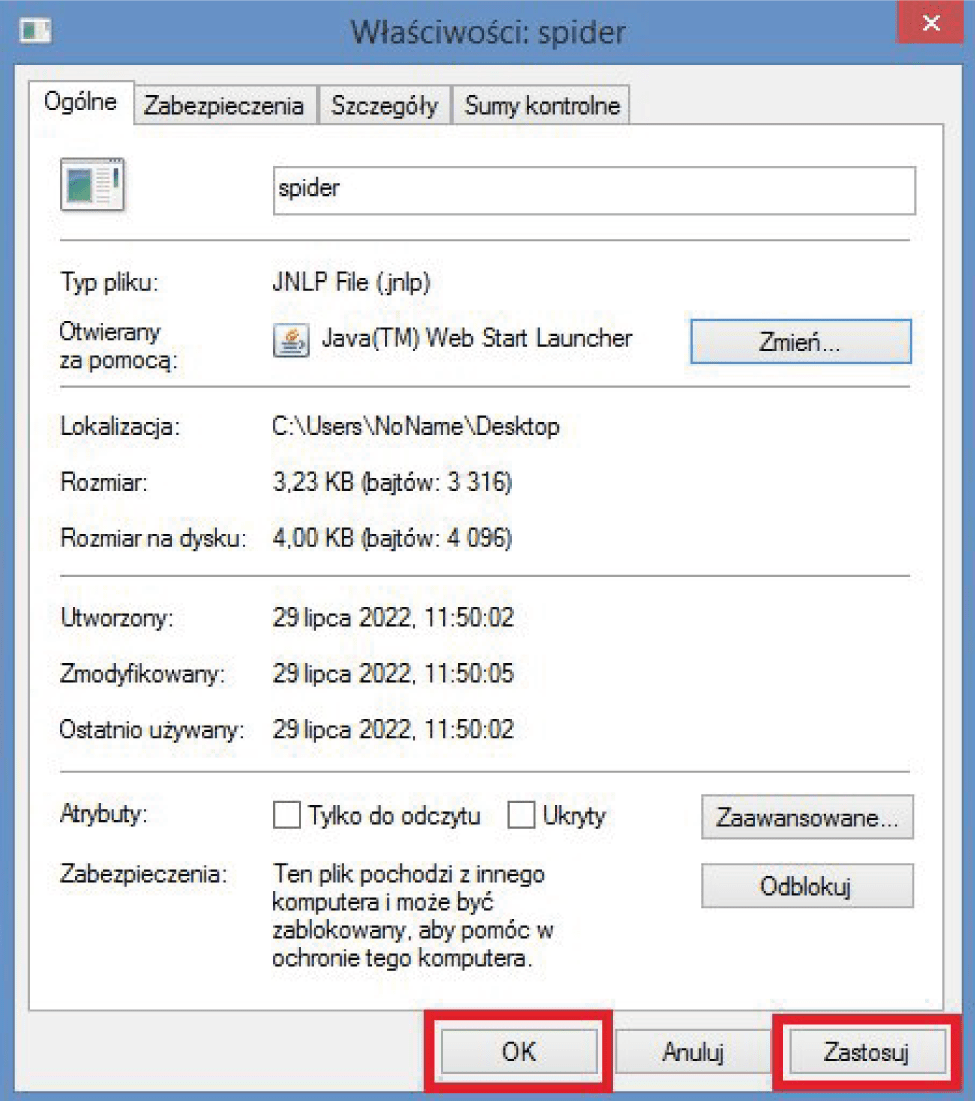
After navigating to the given directory, we search for and select the javaws file, then confirm our choice and apply the changes in the main Properties window of the spider.jnlp file with the Apply and OK button, after this procedure we will already be able to use KVM console applets properly.
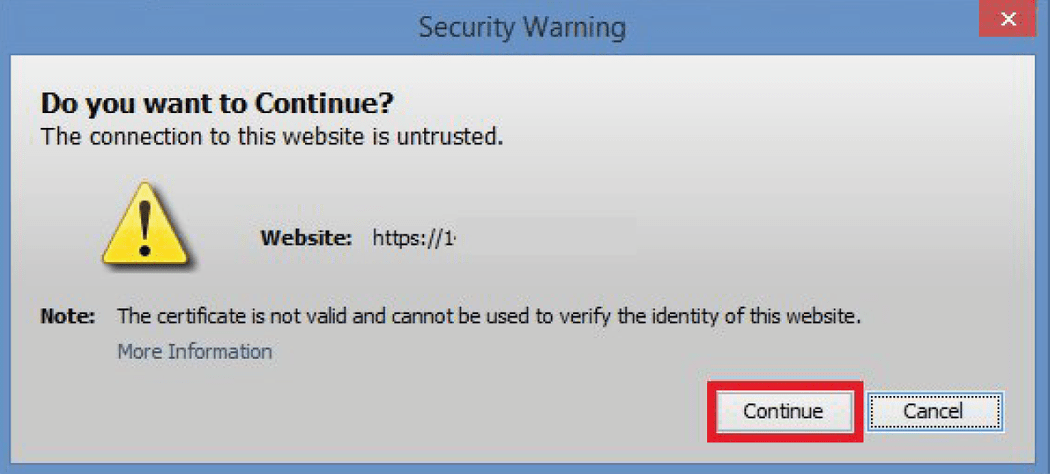
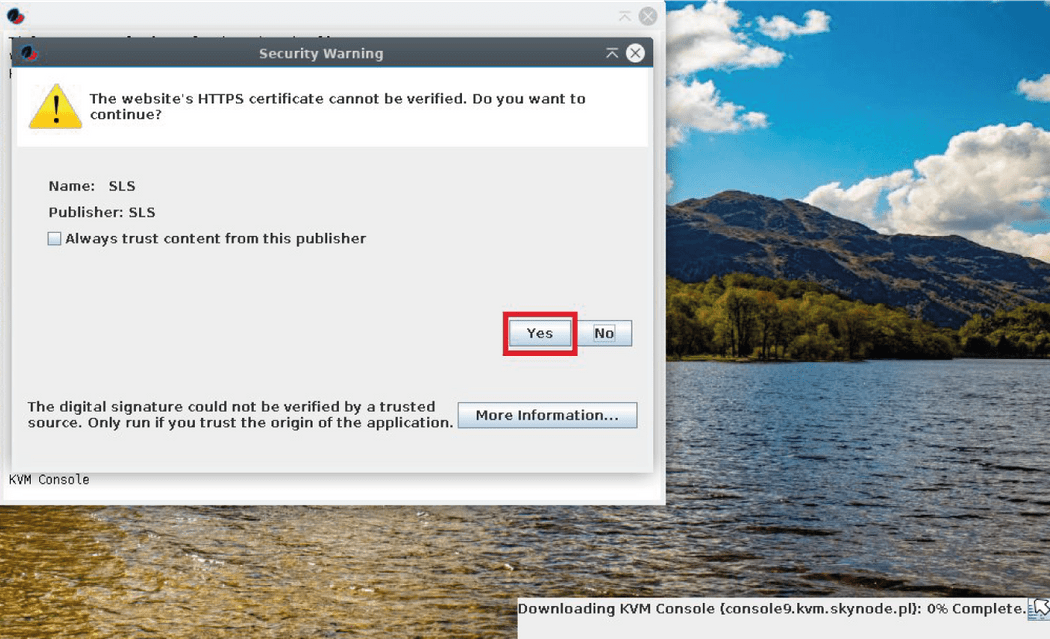
After setting the appropriate associations with the spider.jnlp file, we open it just like any other program by double-clicking on the icon, while running the file we will receive several notifications (one of them in the screenshot below) which we need to accept in order to proceed.
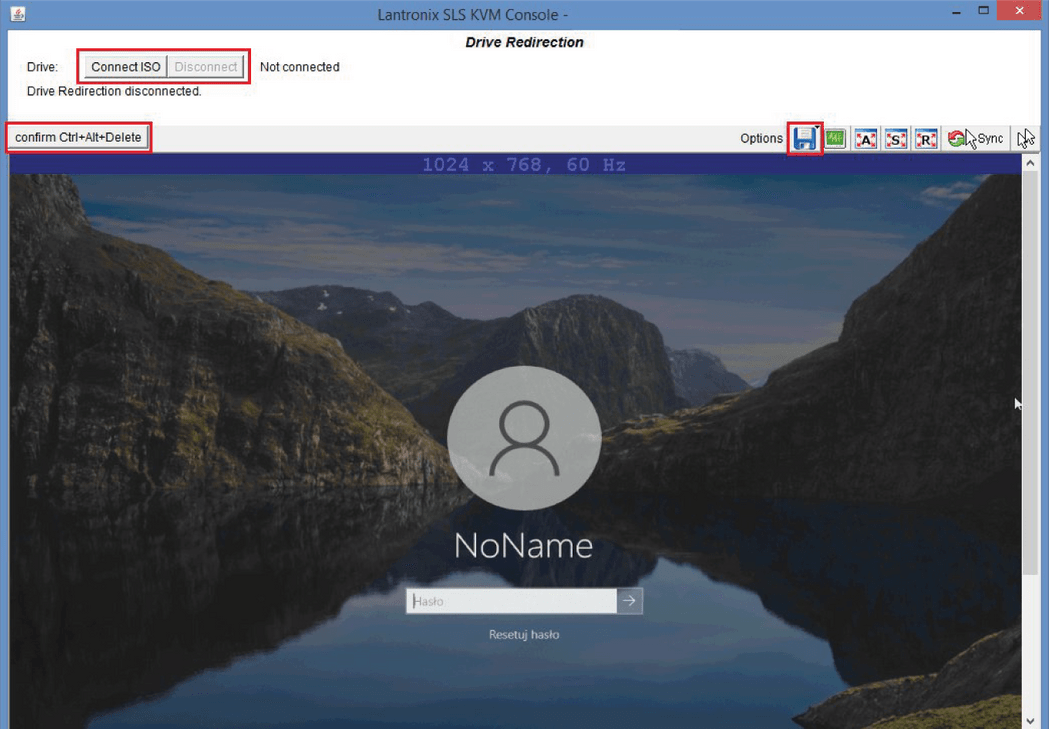
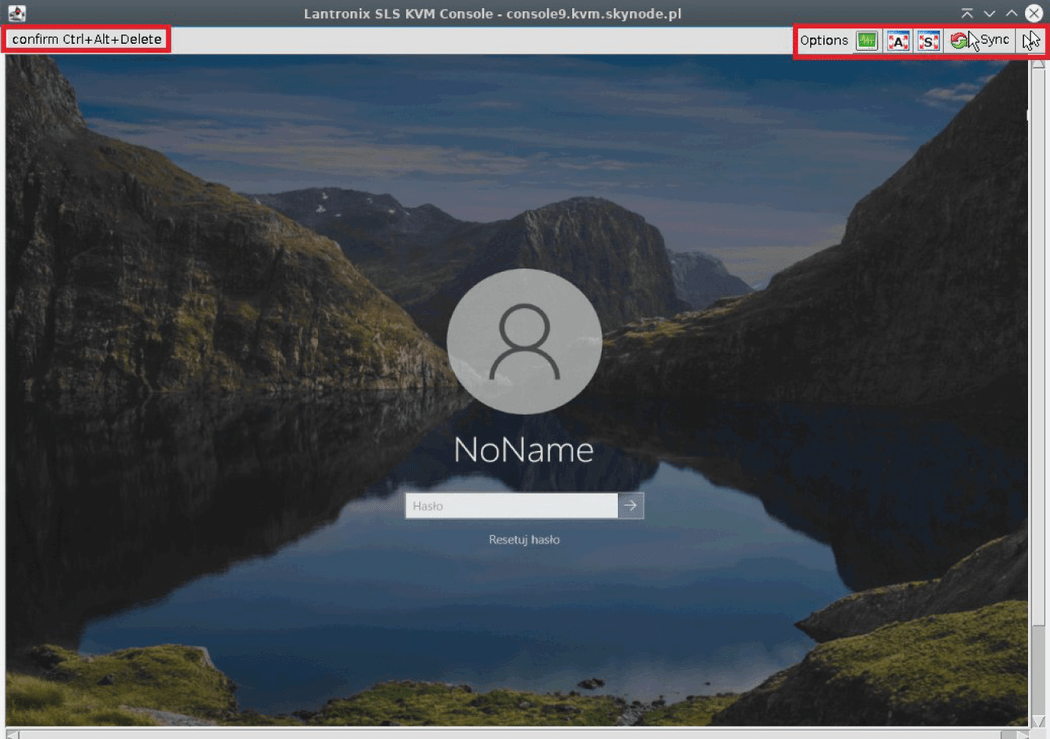
Once the KVM console is opened correctly using the applet, a window similar to the aforementioned remote desktop connection will appear to our eyes.
On the screen visible above we can already log in to the system of our dedicated server (in this case it is Windows, if Linux was installed on the server without a graphical interface we would see the same console (CLI) as in the case of SSH connection).
Among the visible buttons in the KVM console window, 2 of them should be distinguished, the first one is the confirm button Ctrl+Alt+Delete, after clicking it our server will restart, during the restart we will be able, among other things, to go to the BIOS settings of the dedicated server motherboard, for example, to run the ISO image.
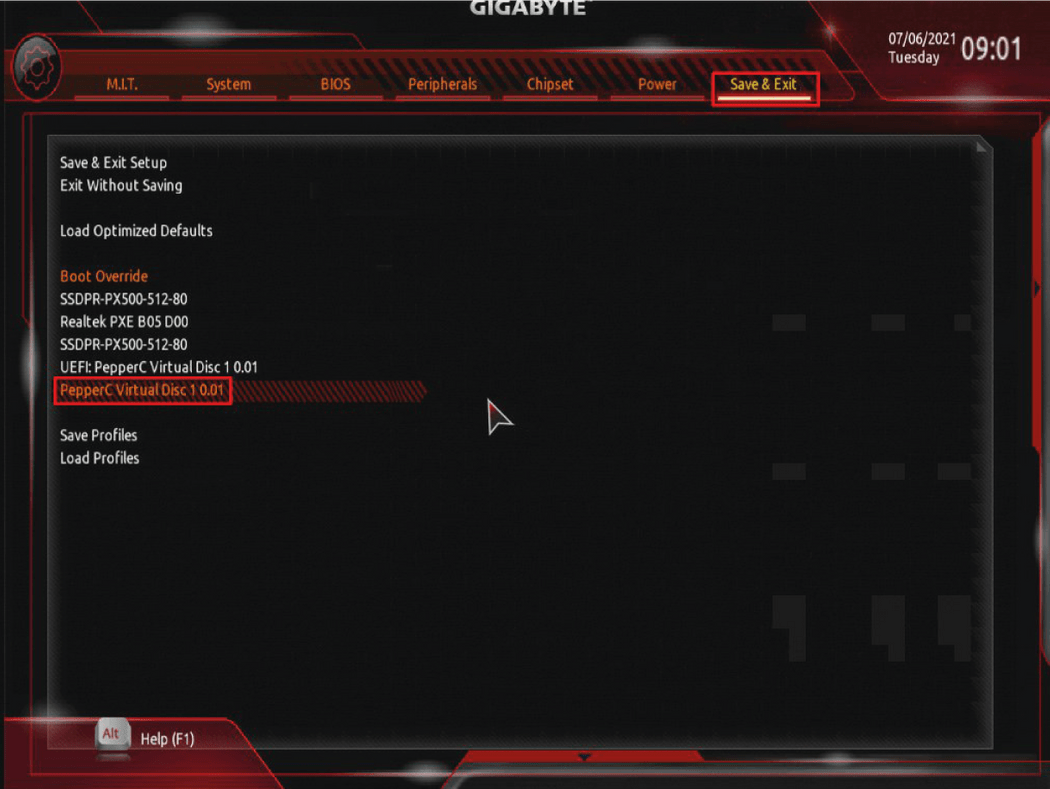
The second highlighted button is the floppy disk icon, after clicking it we will get the possibility to emulate the CD/DVD drive on our server. This will allow us to mount the ISO image of our choice from the disk of our computer, after mounting the selected ISO image, the server should be restarted. Next, in the BIOS settings of the motherboard, force the system to boot from our ISO image, to do this, in the last tab of the motherboard, select the PepperC Virtual Disc 1 0.01 option, and then confirm it with the Enter key.
Note: The option to manually mount ISO images of our choice is only available for dedicated servers with AMD Ryzen 5 and AMD Ryzen 7 processors, in addition, on the computer from which we connect to the dedicated server via KVM console the currently used system must be Windows.
If we do not have this option, please contact the 24/7 technical customer support available at the following email address: admin@mevspace.com. When contacting us at the e-mail address provided, please send information about your desire to use a custom ISO image by specifying the exact distribution name you want to use or by providing an easily accessible link to download the ISO image of your choice. After sending such information, our technicians will prepare a bootable USB flash drive with the ISO image of your choice and then place it on the dedicated server, which will give the customer the ability to run the reinstallation of the system using the ISO image of his choice.
Linux – Java
After clicking on the thumbnail preview of our server's screen or the KVM Console button, it will start downloading the spider.jnlp file, this is a Java application file that allows us to control our dedicated server through the KVM console. In order for the KVM console to work properly on Linux, just like on Windows, we will need Java software.
To do this, to begin with, let's check the validity of the packages installed on the system, to do this in the console window (CLI) use the following command:
sudo apt update
The system will then check whether the software repositories have been updated against the currently installed packages. If the latest versions of software are installed on the system we will see a message about the lack of possible updates, otherwise we will be informed about the number of available packages to update. To proceed to update them in the console window (CLI), use the following command:
sudo apt upgrade
After executing the command you will be informed which packages will be updated and which, if any, will be removed, to allow the update you must select one of the options (yes/no):
Y/n
In our case, it will be Y or y, the entered option is then confirmed with the Enter key.
Once the currently installed packages have been correctly updated, we can move on to installing the Java software.
In the console window (CLI), we execute the following command:
sudo apt install default-jdk
Next, once we have installed the Java software, we need to install the Java applet runtime environment on Linux under the name IcedTeaWeb, to do this we execute the following command in the console window (CLI):
sudo apt install icedtea-netx
Once both packages are properly installed, we need to make changes to the configuration of our Java software so that applets with the *.jnlp extension are properly run on Linux.
To do this, in the console window (CLI) we navigate to the directory where Java is installed, the default path to the directory of interest looks like /usr/lib/jvm/. To access it in the console window (CLI) we execute the following command:
cd /usr/lib/jvm/
After navigating to a given directory, we need to check its contents with the ls command.
As we can see, our system does not have only one Java software folder, so after listing all the directories in this location, it is necessary to make changes to one of the files (java.security) in each of these directories.
To begin with, we will make changes to the java.security file in the first of the available directories, for this we immediately go to edit the file in question by executing the following command:
sudo nano default-java/conf/security/java.security
If you want to change the contents of a given file in other directories, just rename the first directory from default-java to, for example, java-11-openjdk-amd64, keep in mind that in our case there may be more or less directories, and that they may have completely different names than the ones shown in the screenshot, in which case you should use the names of the first directory consistent with the ones available with us.
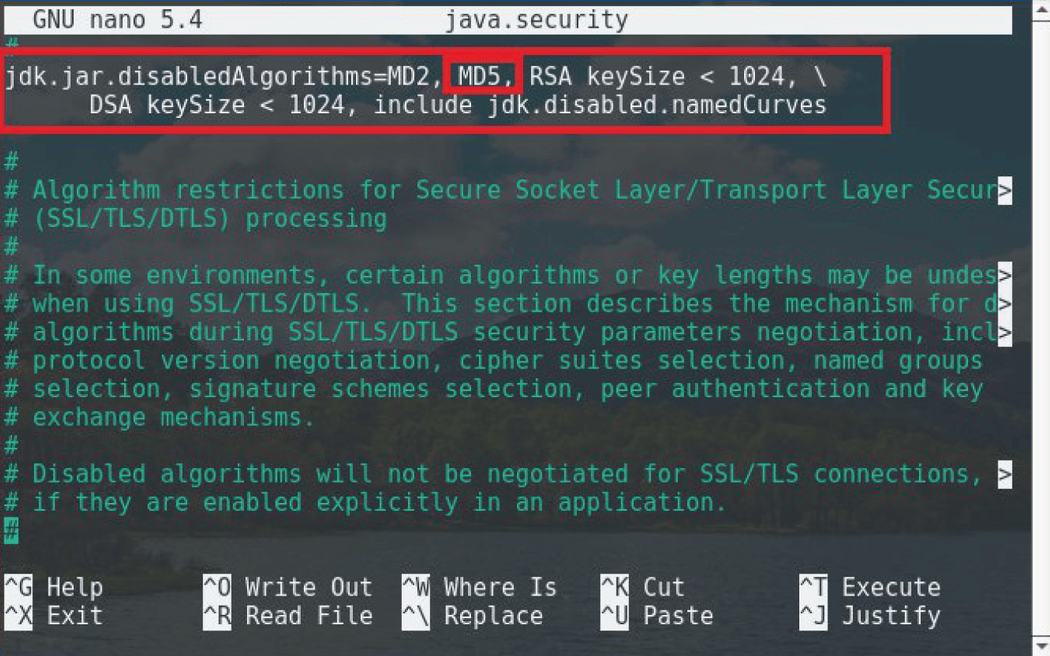
After correctly opening the java.security file in the editor, we find the following lines:
jdk.jar.disabledAlgorithms=MD2, MD5, RSA keySize < 1024, \DSA keySize < 1024, include jdk.disabled.namedCurves
Of the retrieved lines we remove MD5 or copy and paste them below with MD5 removed. We comment out the original lines using #.
After proper editing, our lines should look more or less like the following screenshot.
After making changes, save them with ctrl+s and then exit the editor with ctrl+x.
Note that changes to the java.security file should be made in each of the available directories in the /usr/lib/jvm/ directory, if we already know what directories are in the jvm directory we can make changes to the java.security file with one command, in the test case below are the exact commands for each directory:
sudo nano /usr/lib/jvm/default-java/conf/security/java.security
sudo nano /usr/lib/jvm/java-11-openjdk-amd64/conf/security/java.security
sudo nano /usr/lib/jvm/java-1.11.0-openjdk-amd64/conf/security/java.security
sudo nano /usr/lib/jvm/open-jdk11/conf/security/java.security
If there is no java.security file in a given directory then we can bypass that directory.
After making all the necessary changes, we can proceed to launch the Java applet, just like on Windows, by double-clicking on the icon, if the *.jnlp files have not been correctly associated with the previously installed software we will receive a message asking us to choose the launcher software for the file, from the list then displayed we should choose the option containing the name IcedTeaWeb/IcedTeaWeb Launcher, while launching the file we will receive several notifications which we should accept in order to proceed.
The open window of the KVM console looks a little different from Windows, the only significant difference is the inability to emulate a CD/DVD drive, so if you want to reinstall the system from a custom ISO image on a dedicated server, you should contact 24/7 technical support at e-mail: admin@mevspace.com, you should send information about your desire to use a custom ISO image by specifying the exact name of the distribution you want to use or by providing an easily accessible link to download the ISO image of your choice, after sending such information our technicians will prepare a bootable USB flash drive with the selected ISO image and then place it on the dedicated server, so that the customer will gain the ability to run the reinstallation of the system using the ISO image of his choice.
The rest of the buttons such as confirm Ctrl+Alt+Delete work the same as for Windows.
Windows/Linux – HTML5
Above is the possibility to use KVM console using Java software, however, some users would prefer not to use Java software to connect to their dedicated server through KVM console, for such users, our KVM consoles can be used in HTML5 mode so there is no need to have Java software installed as well as applying all the above mentioned procedures.
If a customer would like to use KVM console in HTML5 mode, he has to contact our 24/7 technical customer support at the following e-mail address: admin@mevspace.com, after contacting us, the selected KVM console will be switched to HTML5 mode so that the connection with our dedicated server via console will be done only in our browser window.
The downside of this solution is the inability to emulate the CD/DVD drive of the KVM console, regardless of the system currently in use (Windows/Linux).
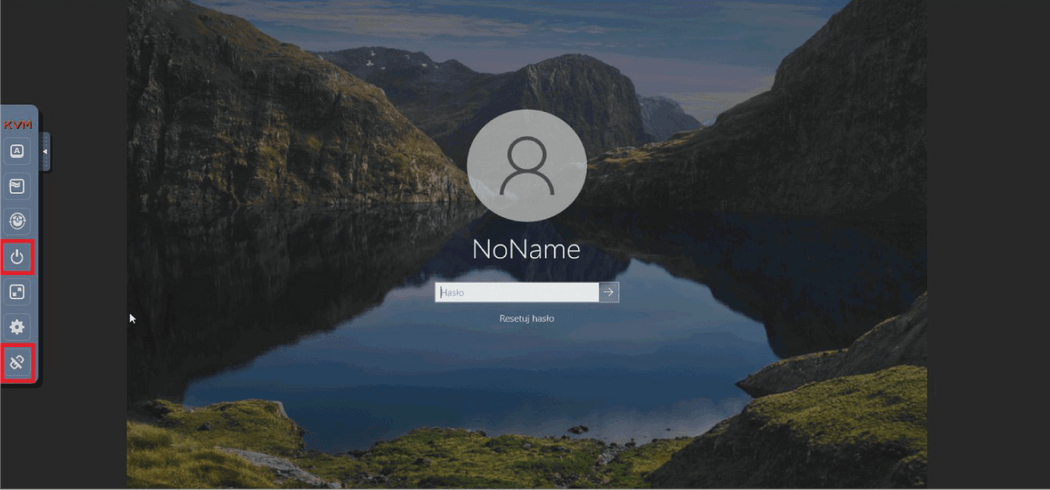
The screenshot marks the button responsible for restarting the server and disconnecting the KVM console to return to its home screen immediately after logging in.
